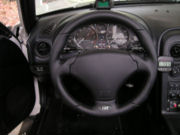
IL Motorsport RAID/ATIWE/HUNGARY steering wheel
Airbag-equiped afterarket steering wheel. Very good looking wheel.
Warning
Unexpected failure of the horn button can be very dangerous under the
right circumstances, but deployment of the airbag when it should not,
or nondeployment when it should is almost certain to
cause at least injury, and quite likely paralysis or dead.
The below description of my installation are not installation
instructions. Use them only to get a comprehensive
idea of the steps involved, and
for additional clarification, but the correct instructions (which are
likely to change periodically) must be obtained from:
- The Mazda Workshop manual for your year for
how to remove the old airbag and
steering wheel, (if you want to cheap out, the $20 Enthusiast 1.6
(1990-1993) or 1.8 (1994-1997) Manuals have a description of the
process.)
- The adapter kit installation flyer on how to adapt the old
wiring to the new airbag.
- The Raid/Atiwa installation manual for the final steps.
If you follow one or all descriptions below, you do so strictly on
your own risk. I am not a mechanic or an expert in any sense. I did
not blow my head off or paralyze myself for life, but that may be just
because I was lucky. If you see a mistake in the descriptions, let me
know so that I can fix it.
Installation
Imagine, if you want, your kids throwing an airbag face-down in a
campfire to see what happens, and the hardware thrown up by the
explosion decapitates one. Get the message? Put airbags down
face-up, so that if an explosion happens, the hardware is blown into
the ground, rather than up into the air. Do not put any objects on
the airbag either. Same idea. Make sure kids cannot swipe the
airbags.
Of course, being made orphans prematurely will not do your kids much
good either. An airbag can blow your head off if you are working
close to it when it goes off. Do not even think of trying to
measure continuity on any circuits related to the airbag with a
multitester or whatever. Keep open flames far away. I do not know
from what height you can drop an airbag without it going off, or how
much static electricity they can take, and my enthusiasm to find out
is frankly nonexisting. So, if you find out and live to tell the
tale, let me know so that I can add those interesting tidbits here.
Make sure you do not create shorts. Do not try to repair any damaged
cable; get a replacement from trussvillemazda.com or the dealer.
Especially if you damage the clockspring, get a new one. It
will short out, as I discovered myself in the past when I
used the brute-force method of wheel removal.
When first turning on the ignition after installation, sit outside the
car, and reach below the steering wheel; do not sit in the
car. Remember that the airbag explodes mostly upward. Better your
car destroyed than you.
If you do not have kids, and you want to follow my installation
process, please reduce your life insurance so that society does
not suffer needlessly under my mistakes.
All that said, I had no big problems. In fact, mine was quite
problemless compared to most installations of aftermarket goodies. As
appropriate for a critical system, the quality of parts was very good.
Though part of the instructions were in German. Of course, Germany is
where I bought my kit, so I guess I cannot complain. I list some
installation times, so you can see how I was progressing.
First, of course, I had to wait until I got the right adapter kit.
Initially, I received the NB (1999+ Miata) kit. Which will not work
on a 1996. And vice-versa. So, if you are reading this to find
out how to install in a 1999+, think again.
I also got appropriate tools; it is just stupid to take risks with a
safety-critical system like this and/or destroy the threads of a $700
steering wheel to save $30 or whatever on tools you can reuse for
other purposes or resell on E-bay. (Or borrow.) Besides basic tools,
you need a small and mid size torque wrench, a T-30 torx socket driver
with at least 1 inch sticking out above the socket (the torx
screws hold the airbag, and are an inch recessed into the wheel) and a
set of metric hex socket drivers for screws with inside hex heads. I
got a suitable torx set from Wal-Mart for $20. I also got a set of
SAE US hex drivers there for $10 (actually two identical sets by
mistake), but I found that the fit of the SAE hex in the metric screws
was poor and you are likely to damage the screws. I think mine are
still OK, but I will get a metric set from Sears next time.
 (1:07)
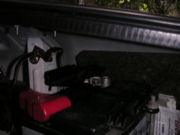
I checked whether I still remembered my radio code. Roger. Then
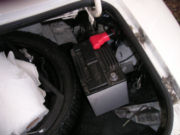
I disconnected the negative battery terminal. I first ensured the positive
terminal was properly protected from anything touching it in the heat
of installation. Shorting positive and negative battery terminals is
not something you want to do. Very bad news... I used a long toggle
to loosen the negative battery terminal. It was hardly attached!
If I had to do it again, I would just have removed the battery hold
down bracket right away, since that is what I ended up doing eventually
anyway. Bend the terminal out of the way so that it cannot accidentally
reconnect.
(1:07)
I checked whether I still remembered my radio code. Roger. Then
I disconnected the negative battery terminal. I first ensured the positive
terminal was properly protected from anything touching it in the heat
of installation. Shorting positive and negative battery terminals is
not something you want to do. Very bad news... I used a long toggle
to loosen the negative battery terminal. It was hardly attached!
If I had to do it again, I would just have removed the battery hold
down bracket right away, since that is what I ended up doing eventually
anyway. Bend the terminal out of the way so that it cannot accidentally
reconnect.
Then I spend some time finding my swivel-head socket-rachet. After
much searching in my house and car, I finally disovered it on top of
the car-cover I had taken off before starting installation. I do not
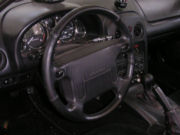
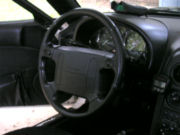
know how it got there. I also took some pictures of the old steering
wheel while still on the car for comparison purposes. This took the
half hour you need to wait after taking off the negative battery
terminal before proceeding. (The airbag has a backup "battery", a
condenser, so it can still blow after the car battery has been
disconnected, unless you give it half an hour to discharge.)
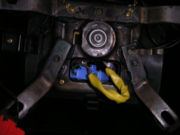
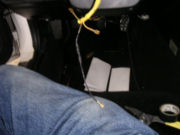
 (1:36) Next I took off the cover below the steering column. Two
philips screws.
(1:36) Next I took off the cover below the steering column. Two
philips screws.
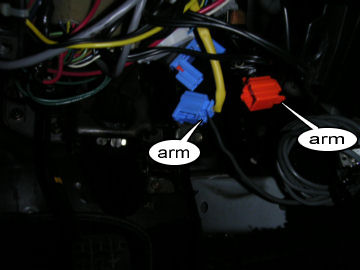
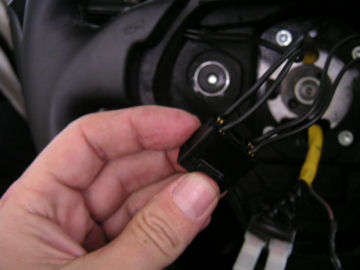
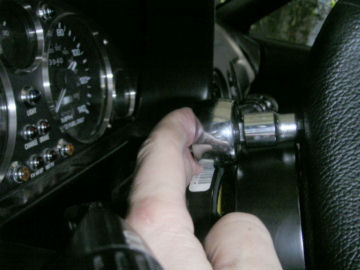
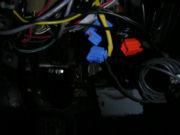 Then struggling with the "clock spring connector," a
blue and orange contraption below the cover, since I had forgotten how
to take it apart. (Unlike the usual electrical connectors, this one
comes apart real easy if you do it right.) Went to search for a flash
light to see better. Orange comes off first. Depress the catch as
usual, and then pull the connector from the assembly in the direction
of its wire. It should come off without much force. Next, to pull
off the blue connector, its catch must be pressed in the direction
perpendicular to the plane of the assembly. Confusing. The "arms" of
the catches are fairly evident in the magnified picture. (1:48)
Then struggling with the "clock spring connector," a
blue and orange contraption below the cover, since I had forgotten how
to take it apart. (Unlike the usual electrical connectors, this one
comes apart real easy if you do it right.) Went to search for a flash
light to see better. Orange comes off first. Depress the catch as
usual, and then pull the connector from the assembly in the direction
of its wire. It should come off without much force. Next, to pull
off the blue connector, its catch must be pressed in the direction
perpendicular to the plane of the assembly. Confusing. The "arms" of
the catches are fairly evident in the magnified picture. (1:48)
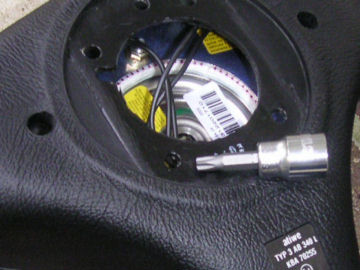
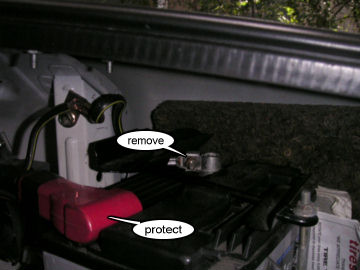
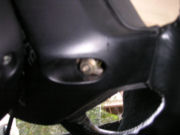 Next I took off the nuts at the back of the Mazda steering
wheel keeping its airbag on. There are four in all; the picture shows
one of them. Actually, there would have been four if at some time in the
past I would not have broken off the thread holding one of them. So there
were really only three.
Next I took off the nuts at the back of the Mazda steering
wheel keeping its airbag on. There are four in all; the picture shows
one of them. Actually, there would have been four if at some time in the
past I would not have broken off the thread holding one of them. So there
were really only three.
 A swivel-head ratchet really helps getting them off.
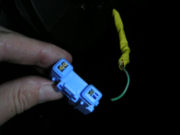
 Take the inside clock spring connector out of its clamp and apart.
You can see the orange connector's catch pretty nicely here. Detach
the rope holding the airbag from the steering wheel. Remove the
airbag and put aside face-up in a safe place.
Take the inside clock spring connector out of its clamp and apart.
You can see the orange connector's catch pretty nicely here. Detach
the rope holding the airbag from the steering wheel. Remove the
airbag and put aside face-up in a safe place.
 Put the base of the clock spring
connector in the hole so that later we do not snag on it when removing
the wheel. (Actually, you might as well cut it off now; see
later.)
Put the base of the clock spring
connector in the hole so that later we do not snag on it when removing
the wheel. (Actually, you might as well cut it off now; see
later.)
 Make sure the steer is straight. Mark the top of the steering column
end and its nut, just to be sure. Try various size sockets from tool
chest on steering column nut. Search for M 21 socket. Find it among
the tools in the trunk. Search trunk for 1/2" socket extension
that must be there since we need it to replace a wheel in case of a flat.
Search. Take out spare tire. Search behind spare tire. Get flashlight
to find it. Search tools bag and tools box and area around the jack
several times. Go in the house. Search tools chests, storage room,
and everywhere else. No extension. Use 3/8" extension and 1/2" adapters
to reach M 21 socket. Try getting nut off steering column. Go in the
house and find a nice breaker bar. Nut comes off fairly easily
with it. (2:35).
Make sure the steer is straight. Mark the top of the steering column
end and its nut, just to be sure. Try various size sockets from tool
chest on steering column nut. Search for M 21 socket. Find it among
the tools in the trunk. Search trunk for 1/2" socket extension
that must be there since we need it to replace a wheel in case of a flat.
Search. Take out spare tire. Search behind spare tire. Get flashlight
to find it. Search tools bag and tools box and area around the jack
several times. Go in the house. Search tools chests, storage room,
and everywhere else. No extension. Use 3/8" extension and 1/2" adapters
to reach M 21 socket. Try getting nut off steering column. Go in the
house and find a nice breaker bar. Nut comes off fairly easily
with it. (2:35).
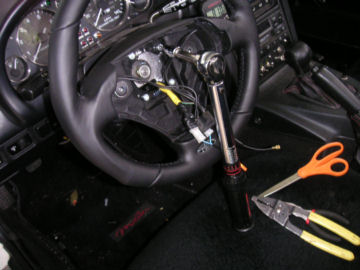
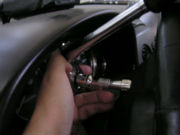
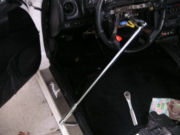
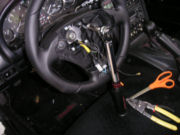
 If you plan to try to use the brute force method to get the steering
wheel off the column, I recommend that you leave the nut partly on the
steering column. When I got impatient one day and used this method, I
hit my nose very painfully with the rim of the wheel when it came off,
and I destroyed the $300 or whatever clock spring. Wiser now,
I used a steering wheel puller I got from Autozone. Carefully
remove the wheel without hurting cables and set aside.
If you plan to try to use the brute force method to get the steering
wheel off the column, I recommend that you leave the nut partly on the
steering column. When I got impatient one day and used this method, I
hit my nose very painfully with the rim of the wheel when it came off,
and I destroyed the $300 or whatever clock spring. Wiser now,
I used a steering wheel puller I got from Autozone. Carefully
remove the wheel without hurting cables and set aside.
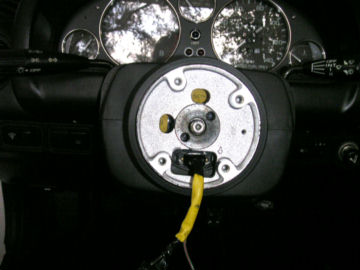
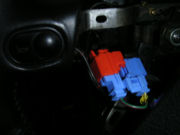
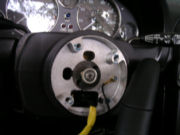
 Make sure the clock spring connector stays with the arrow up. If you
ever mess it up, the neutral position is almost three turns from the
end of motion either way. Watch it, the thing is delicate. Next the
sensitives may want to avert their eyes. You need to cut through the
wires directly behind the clock spring connector base.
Make sure the clock spring connector stays with the arrow up. If you
ever mess it up, the neutral position is almost three turns from the
end of motion either way. Watch it, the thing is delicate. Next the
sensitives may want to avert their eyes. You need to cut through the
wires directly behind the clock spring connector base.
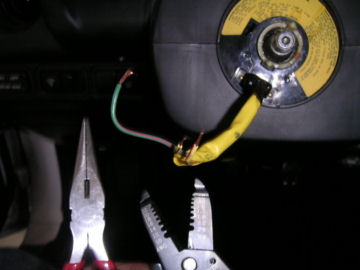
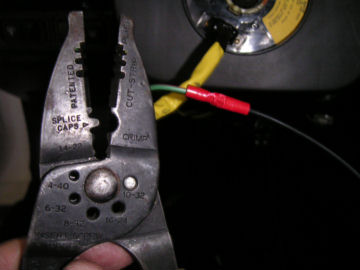
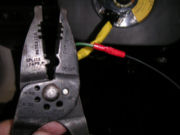
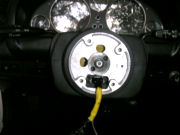
 Remove some of the plastic sleeve around the wires and then strip them
about 1/4". The exact length to strip can be seen from the spades
that come in the connector kit: the "arms" should bite into the plastic
isolation to secure the spade to the wire; the inner crimp area should
grip all copper for a good contact. (You can see the clock spring not
being straight in the picture.)
Remove some of the plastic sleeve around the wires and then strip them
about 1/4". The exact length to strip can be seen from the spades
that come in the connector kit: the "arms" should bite into the plastic
isolation to secure the spade to the wire; the inner crimp area should
grip all copper for a good contact. (You can see the clock spring not
being straight in the picture.)
 Crimp the crimp connector attaching the new horn button power wire to
the green and red horn wire. I do not have much trust in these kinds
of connectors, so I used (commercial quality) electrical tape to wrap
it all good and tape the wires to the connector, and hope for the best.
Crimp the crimp connector attaching the new horn button power wire to
the green and red horn wire. I do not have much trust in these kinds
of connectors, so I used (commercial quality) electrical tape to wrap
it all good and tape the wires to the connector, and hope for the best.
 One by one, bend the arms of the spades around the wire insulation of
the yellow/grey and yellow/red wires, and make sure they "bite" well
into the plastic. Then fold the crimp connection about the copper to
make a connection that stays put.
One by one, bend the arms of the spades around the wire insulation of
the yellow/grey and yellow/red wires, and make sure they "bite" well
into the plastic. Then fold the crimp connection about the copper to
make a connection that stays put.
 Attach the new airbag connector cable to the spades. It was
not stated how, so I attached red stripe to red stripe, and grey
stripe to grey stripe. Make sure they click securely.
Then I wrapped each connection
completely with tape, and then I taped those two together to make
things hopefully more secure. (3:33).
Attach the new airbag connector cable to the spades. It was
not stated how, so I attached red stripe to red stripe, and grey
stripe to grey stripe. Make sure they click securely.
Then I wrapped each connection
completely with tape, and then I taped those two together to make
things hopefully more secure. (3:33).
Unscrew the two torx screws holding the airbag of the new steering
wheel. As you see below, you really need that one inch sticking out
of the torx socket. Place the airbag face-up in a safe place.
 Ensure the arrow is straight up on the clock spring. Put the adapter
on the steering column, its arrow straight down, feeding the wires
through its square hole, and making sure the clock spring extensions
match the cut-outs in the adapter. Make sure the adapter grasps the
steering column correctly. If you cannot get it quite exactly
vertical, the steering wheel angle will be fixed with your next wheel
alignment. Screw the M 21 nut back on the steering column hand-tight
to keep things secure from moving.
(3:45)
Ensure the arrow is straight up on the clock spring. Put the adapter
on the steering column, its arrow straight down, feeding the wires
through its square hole, and making sure the clock spring extensions
match the cut-outs in the adapter. Make sure the adapter grasps the
steering column correctly. If you cannot get it quite exactly
vertical, the steering wheel angle will be fixed with your next wheel
alignment. Screw the M 21 nut back on the steering column hand-tight
to keep things secure from moving.
(3:45)
 Screw the steering wheel on using the four hex screws. Set torque wrench
to 10 Nm. For those who want to cheat: that is not much torque. The
screws have a coating to prevent them from vibrating loose. Use the
right torque. Tighten steering wheel column nut to 45 Nm. (4:00)
Search car for ground cable. Panic. Search some more. Search trunk.
Maybe never taken out of my house? Find ground cable in house.
Remove UPC sticker from airbag. Do not put on steering column,
as instructed, in case we later want to deny everything. UPC
stickers can easily fall off, right?
Screw the steering wheel on using the four hex screws. Set torque wrench
to 10 Nm. For those who want to cheat: that is not much torque. The
screws have a coating to prevent them from vibrating loose. Use the
right torque. Tighten steering wheel column nut to 45 Nm. (4:00)
Search car for ground cable. Panic. Search some more. Search trunk.
Maybe never taken out of my house? Find ground cable in house.
Remove UPC sticker from airbag. Do not put on steering column,
as instructed, in case we later want to deny everything. UPC
stickers can easily fall off, right?
 Put the horn power cable spade and the horn earth into the horn
connector block, which is clamped in a recess in the steering wheel.
Because of size, only one connector will fit in
each hole. Make sure the spades click
securely. Worry about the earth not being connected to earth. Peruse
adapter kit documentation. Peruse airbag installation documentation.
Persuse each some more. Much more. Not a word
can be found. Go into the house to
get a multi-meter, with batteries, to check whether the four hex
screws holding the steering wheel provide a good earth. End up being
vastly under-impressed. Search conscience. Look for other possible
earths. Not very easy. No thread inside the steering column end?
Use flashlight. No. Look more for possible earths. Is the remaining
screw of the adapter kit supposed to provide the earth?
Put the horn power cable spade and the horn earth into the horn
connector block, which is clamped in a recess in the steering wheel.
Because of size, only one connector will fit in
each hole. Make sure the spades click
securely. Worry about the earth not being connected to earth. Peruse
adapter kit documentation. Peruse airbag installation documentation.
Persuse each some more. Much more. Not a word
can be found. Go into the house to
get a multi-meter, with batteries, to check whether the four hex
screws holding the steering wheel provide a good earth. End up being
vastly under-impressed. Search conscience. Look for other possible
earths. Not very easy. No thread inside the steering column end?
Use flashlight. No. Look more for possible earths. Is the remaining
screw of the adapter kit supposed to provide the earth?
 Where does the screw
included in adapter kit go? Finally find hole for this screw well
hidden behind steering wheel. Any way to get it in? No. No? No!
Curse. Remove steering wheel again. Struggle for 15 minutes getting
screw in while hopefully not damaging horn and airbag wires
too much by holding
steering wheel up with one hand to relieve stress on wires, trying to
get recalcitrant screw in hole with second hand, and at the same time
screwing it in with screwdriver in third hand. Think how easy it would
have been to screw this in before even starting
installation, if we would only have been told about it. (5:17)
Where does the screw
included in adapter kit go? Finally find hole for this screw well
hidden behind steering wheel. Any way to get it in? No. No? No!
Curse. Remove steering wheel again. Struggle for 15 minutes getting
screw in while hopefully not damaging horn and airbag wires
too much by holding
steering wheel up with one hand to relieve stress on wires, trying to
get recalcitrant screw in hole with second hand, and at the same time
screwing it in with screwdriver in third hand. Think how easy it would
have been to screw this in before even starting
installation, if we would only have been told about it. (5:17)
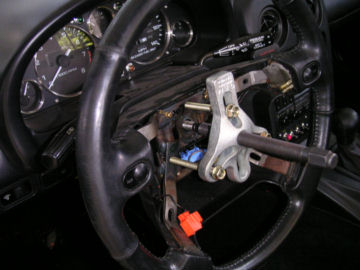
 Put steering wheel back on with hex screws.
Put protective insulating tape around the unprotected
terminals of the horn wire connector block.
Put orange airbag wire connector
in corresponding hole in airbag. It is not stated what way, so I
did it with the wire pointing down rather than up.
It must click in place.
Camera battery is gone, so we can cut back on the pictures.
Put airbag on new steering wheel, making sure no cables are caught.
I put most of the the wiring in the space behind the wheel to
keep it from getting squeezed.
Note that adapter has been cleverly designed not to provide space
for torque-wrench head in torqueing the deeply recessed torx screws.
Remove plastic shroud around steering column to make space by removing
four screws from its bottom, and then working the top
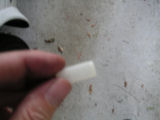
of the shroud off. (Actually, it appears that you only need
to remove the front left screw to get the top of the shroud
off, but anyway.) After much trial and error, put three tiny lock washers
in torx socket to keep
torque wrench head clear of adapter (see gap between socket
and wrench in picture.) Curse a lot and torque torx screws
to 8 Nm. (6:15).
Put steering wheel back on with hex screws.
Put protective insulating tape around the unprotected
terminals of the horn wire connector block.
Put orange airbag wire connector
in corresponding hole in airbag. It is not stated what way, so I
did it with the wire pointing down rather than up.
It must click in place.
Camera battery is gone, so we can cut back on the pictures.
Put airbag on new steering wheel, making sure no cables are caught.
I put most of the the wiring in the space behind the wheel to
keep it from getting squeezed.
Note that adapter has been cleverly designed not to provide space
for torque-wrench head in torqueing the deeply recessed torx screws.
Remove plastic shroud around steering column to make space by removing
four screws from its bottom, and then working the top
of the shroud off. (Actually, it appears that you only need
to remove the front left screw to get the top of the shroud
off, but anyway.) After much trial and error, put three tiny lock washers
in torx socket to keep
torque wrench head clear of adapter (see gap between socket
and wrench in picture.) Curse a lot and torque torx screws
to 8 Nm. (6:15).
 Try to reconnect battery. Find it impossible, so end up taking
battery hold-down bracket off. Which we could have done when
we started installation, and saved a lot of trouble.
Carefully start ignition, sitting outside car and reaching below
steering column to key. No explosion = good explosion. Note that
airbag light comes on and goes off. Much jubilation. Note that
horn buttons do not work. Much cursing. Find that airbag light is
flashing. Consider what may have
gone wrong. No clue. Seems we will need to take it all off again
and search for bad contact. Cursing. After taking off negative battery
lead, wait five minutes to take apart clock spring connector.
Use this time to discover that we never reconnected the connector
in the first place. Conjecture this
may have been the cause for not working of horn and airbag flashing.
Reconnect clock spring connector, reconnect battery.
Turn on ignition from outside the car, note that airbag light comes
on, then goes off and stays off. Press horn buttons, horn sounds.
Victory! Another successful installation by the better mechanic!
Try to reconnect battery. Find it impossible, so end up taking
battery hold-down bracket off. Which we could have done when
we started installation, and saved a lot of trouble.
Carefully start ignition, sitting outside car and reaching below
steering column to key. No explosion = good explosion. Note that
airbag light comes on and goes off. Much jubilation. Note that
horn buttons do not work. Much cursing. Find that airbag light is
flashing. Consider what may have
gone wrong. No clue. Seems we will need to take it all off again
and search for bad contact. Cursing. After taking off negative battery
lead, wait five minutes to take apart clock spring connector.
Use this time to discover that we never reconnected the connector
in the first place. Conjecture this
may have been the cause for not working of horn and airbag flashing.
Reconnect clock spring connector, reconnect battery.
Turn on ignition from outside the car, note that airbag light comes
on, then goes off and stays off. Press horn buttons, horn sounds.
Victory! Another successful installation by the better mechanic!
 Clean up. Find that an insulating cover is left over from the adapter kit.
This is a good sign, since you know that you must have had plenty of parts.
Later I found another such cover in the house, and I deduce that
they must have gone over the two spades. Anyway, taping them down
with electrical tape is probably more secure anyway.
Clean up. Find that an insulating cover is left over from the adapter kit.
This is a good sign, since you know that you must have had plenty of parts.
Later I found another such cover in the house, and I deduce that
they must have gone over the two spades. Anyway, taping them down
with electrical tape is probably more secure anyway.
As always, keep your steering wheel at arms-length.
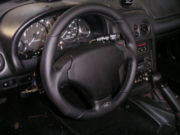
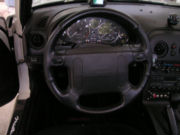
Evaluation
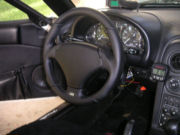
The wheel is a bit smaller in diameter than stock, about an inch.
(The wheel comes in three diameters, and I took the middle one.)
It feels a bit unfamiliar, but I like it. Although it gives a
bit less of an "arm" during autocross (I took the power steering out.)
It will be interesting to see how it handles next autocross.
The wheel is at exactly the same distance as the stock wheel, as far
as I can make out. (They missed an opportunity there, there is enough
free space in the adapter to offer a choice of wheel distance.) The
rim is a lot thicker than stock and has a lot of profiling. It feels
good to me. It is a very nice shade of black. Click for bigger
pictures.
Price
Price depends on the value of the Euro compared to the dollar.
My credit card statement showed a charge of $615 for steering wheel
plus adapter kit, and there was another $60 customs charge.
IL Motorsport
Return
 (1:07)
I checked whether I still remembered my radio code. Roger. Then
I disconnected the negative battery terminal. I first ensured the positive
terminal was properly protected from anything touching it in the heat
of installation. Shorting positive and negative battery terminals is
not something you want to do. Very bad news... I used a long toggle
to loosen the negative battery terminal. It was hardly attached!
If I had to do it again, I would just have removed the battery hold
down bracket right away, since that is what I ended up doing eventually
anyway. Bend the terminal out of the way so that it cannot accidentally
reconnect.
(1:07)
I checked whether I still remembered my radio code. Roger. Then
I disconnected the negative battery terminal. I first ensured the positive
terminal was properly protected from anything touching it in the heat
of installation. Shorting positive and negative battery terminals is
not something you want to do. Very bad news... I used a long toggle
to loosen the negative battery terminal. It was hardly attached!
If I had to do it again, I would just have removed the battery hold
down bracket right away, since that is what I ended up doing eventually
anyway. Bend the terminal out of the way so that it cannot accidentally
reconnect.