Sunday, 05/19/02
Introduction
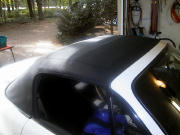
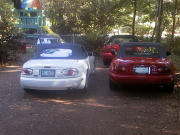
This was a soft-top replacement session. We assembled a 1999+ glass
window top and installed it on Leon's White 1996. The still-good top
that was on there, an original Mazda one with a Brain-Storm glass
window, was installed on Jody's Red 1992.
It provided an opportunity for all to see what a top installation
involves, and maybe save considerable money when the inevitable time
comes. Unfortunately, no members showed up except installers Jody and
Leon. It may be that the club party the day before on Saturday had
left people with little weekend time left. Also, many members have
relatively new Miatas, for which top replacement is still years away.
In any case, for all those who missed it, complete details of our
experiences are below. Note that neither Leon nor Jody had ever done
a top install before. Jody has good tools and is quite handy, (he
likes working on cars,) while Leon has a decent amount of the usual
tools and is clumsy.
General information
Acknowledgements: Miata.net
pages,
kayuautos,
Miata Magazine article from September 2000 (vol 11, no 4),
the Mazda Miata Enthusiast Manuals, and the Mazda Workshop manual
provide good information.
And I
particularly thank various posters from rec.autos.makers.mazda.miata
for helpful hints. In particular, Adam Payrot for explaining how much
easier and quicker it is to remove the frame, Jim Hayter for warning me to
figure out the attachment points for the straps, Mike Robison for helping
me with the riveting, and John for
explaining that riveting the rain rail to the top is not just a waste
of time but a disadvantage for installation. All of these were
absolute life-savers. And most of all Jody for helping me
with the installation and stopping me from blundering around.
Needed:
- Waterpump pliers.
- Riveter. My Sears rivet tool did not do the kind of rivets that
came with the top, so I substituted the blind rivet type with pull
rod, in 5/32 x 1/4 inch size.
- Flat and phillips screw drivers of various sizes.
I got the ratchet type that will do tight places from Sears, but did not
really need it.
- Torx bits if you have a hard-top striker plate. (Neither of us did.)
- A sturdy fork or equivalent to get the plastic carpet pins (nails) out.
I found a suitable tool at Wal-Mart. Do not try to pull on the carpet.
Trying to pop them out with screw drivers may be a mess. The pins are
typically available at hardware and automotive stores if you break a few.
- Drill.
- Pick-up tools. I did not need them. Put something in the drain
holes behind the seat belt towers to prevent nuts and such from dropping
in them.
- Double-sided tape.
- Clamps.
- Small scissors to widen some holes in the vinyl.
- Liquid paper white-out to mark where to widen the holes.
- Magnifying glass.
- Flash light.
- Ethyl alcohol. I got it from the Eckerd drug store.
- Camera to take pictures of it all.
- 1/4 x 3/8sq Nylon anchor nuts, with #8 x 3/8 sheet metal screws
to hold weatherstrip brackets and end plates on.
- M4-.7x6 mm machine screws with washers to screw the short straps to the
frame.
- 10, 12 and 17 mm sockets. A swivel head driver was helpful.
- Needle-nose pliers.
- An impact driver was needed to get my frame stops off. This was not
needed on Jody's Red.
I guess you may be able to leave the carpet partially
on if you cannot get them off.
- Torque wrench. Important torques are
6 ft lb for the tenax fastener bolts that hold the boot cover,
7 ft lb for the nuts clamping
the rear bottom of the top and the rain rail using the three "set plates",
16 ft lb for the six bolts that
bolt the top frame to the car, and
60 ft lb for the bolts holding the side impact bar.
(Those are averages from the 1995 Mazda Workshop manual.)
Mark parts and put them down in plastic bags at the same side of the
car as they came from to avoid trying to figure out what part came
from where during reassembly. Use a torque wrench to reassemble.
Jody tightened various bolts within the accuracy of my wrench on
feel, (I checked using the torque wrench,) but you cannot do
this without many years of practice using torque wrenches.
Terminology: In the write-up, "front", "bottom", etcetera of the top refer
to the position relative to a driver in the car with the top up. For
example, "front" is where the top meets the windshield header.
Be carefull to cover working surfaces with towels to prevent the top
or window becoming damaged.
Putting the 99+ soft top on the 99+ frame.
This part explains how the 1999 top was assembled from a
1999+ frame, 1999+ vinyl with glass window, rubber weather strips and
brackets, all new from Trussville Mazda,
and from hardware removed from my old 1996 top. The assembly
was done by me in the weeks before the tech session, (in the
air-conditioned comfort of my living room,) to keep the tech session
time reasonable. The intention was to allow people to examine the top
before it was installed, with a description of what the pre-assembly
involved. In any case, a full description and exhaustive pictures are
below.
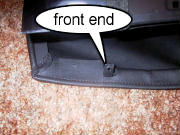 First you need to put the springs in the seams along the sides
 of the top. My vinyl top came with the springs already in the seams.
The front end of the spring is shown in the first
picture, the rear end in the second.
of the top. My vinyl top came with the springs already in the seams.
The front end of the spring is shown in the first
picture, the rear end in the second.
|
 My first step was attaching the soft top to the first frame cross bar
from the front; the one near the middle of the top. See picture to the left.
(You are really supposed to attach the top to the bar
after attaching the rear
part of the top to the frame, especially on a 1990-1997 top, where you need
to attach the top to three crossbars instead of just one.
But on the 1999+, you can do it first, and since it is such a pain already,
I did so.)
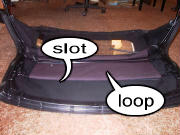
There is a stitched seam on the soft top at the place of the bar,
on the separate canvas "loop" attached to the top (appears purple in
the picture above,) that goes in a slot on the bar.
My first step was attaching the soft top to the first frame cross bar
from the front; the one near the middle of the top. See picture to the left.
(You are really supposed to attach the top to the bar
after attaching the rear
part of the top to the frame, especially on a 1990-1997 top, where you need
to attach the top to three crossbars instead of just one.
But on the 1999+, you can do it first, and since it is such a pain already,
I did so.)
There is a stitched seam on the soft top at the place of the bar,
on the separate canvas "loop" attached to the top (appears purple in
the picture above,) that goes in a slot on the bar.
|
 The slot is really the gap between the bar and a clamp welded
on it. In the picture to the left, you can see the two sides of the flap
bending around the bar and clamp (the inner piece hugging the
clamp closely,) and then enter the slot. (There is also some padding
glued onto the bar that is not relevent here.)
To install the seam into the slot, bend out the slot with a screw
driver. Careful, bend the screw driver towards the bar, not away from it
or you may hear the spot welds start cracking. Then it is a pain to
get the stitched seam into the slit. Just keep working on it. Make
sure the thing is centered, not stretched, and all the way in there
everywhere. You will
feel when the seam is fully "locked" into the slit.
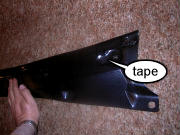
Afterwards some sources say to tighten the slot down by hitting it
with a wood hammer; since I do not have one, I used a rubber hammer,
as well as some squeezing with water pump pliers. Since then I learned
that in the official Mazda version, you use waterpump pliers with tape
around the jaws to avoid damaging the top, and not hammers.
The slot is really the gap between the bar and a clamp welded
on it. In the picture to the left, you can see the two sides of the flap
bending around the bar and clamp (the inner piece hugging the
clamp closely,) and then enter the slot. (There is also some padding
glued onto the bar that is not relevent here.)
To install the seam into the slot, bend out the slot with a screw
driver. Careful, bend the screw driver towards the bar, not away from it
or you may hear the spot welds start cracking. Then it is a pain to
get the stitched seam into the slit. Just keep working on it. Make
sure the thing is centered, not stretched, and all the way in there
everywhere. You will
feel when the seam is fully "locked" into the slit.
Afterwards some sources say to tighten the slot down by hitting it
with a wood hammer; since I do not have one, I used a rubber hammer,
as well as some squeezing with water pump pliers. Since then I learned
that in the official Mazda version, you use waterpump pliers with tape
around the jaws to avoid damaging the top, and not hammers.
|
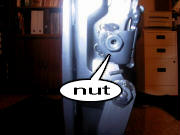 At this stage, you may first want to screw the rear end of the springs
to the frame if you do not want to screw in difficult places. (I did
this a bit later.)
At this stage, you may first want to screw the rear end of the springs
to the frame if you do not want to screw in difficult places. (I did
this a bit later.)
 The place
to screw the end to is the welded-on nut
in the picture to the left. I got an M6 screw at the local hardware store
that fit. The spring attached to the frame is shown in the picture
to the right.
The place
to screw the end to is the welded-on nut
in the picture to the left. I got an M6 screw at the local hardware store
that fit. The spring attached to the frame is shown in the picture
to the right.
|
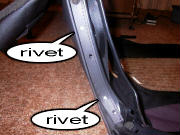 Next, put the top on the rear part of the frame and start riveting it down.
(You might first want to put the nylon locknuts in the square holes of
the frame, but I forgot and found you can squeeze them in afterwards.)
Make sure you put the vinyl on so that any
plastic protectors protect the top correctly from
rubbing against the frame at all sides.
I temporarily attached the top to the frame using clamps
and then did the two rivets in each of the B-pillars. B-pillars
are tech talk for the part of the top that meets the rear edge
of the windows.
To rivet with a blind riveter like mine, put the rivet into the
hole tight, grap the stem with the riveter and move the handles
together while pressing down to keep the rivet tight in the hole.
Release the handles to grip more of the stem and press together
again until the stem breaks off.
Next, put the top on the rear part of the frame and start riveting it down.
(You might first want to put the nylon locknuts in the square holes of
the frame, but I forgot and found you can squeeze them in afterwards.)
Make sure you put the vinyl on so that any
plastic protectors protect the top correctly from
rubbing against the frame at all sides.
I temporarily attached the top to the frame using clamps
and then did the two rivets in each of the B-pillars. B-pillars
are tech talk for the part of the top that meets the rear edge
of the windows.
To rivet with a blind riveter like mine, put the rivet into the
hole tight, grap the stem with the riveter and move the handles
together while pressing down to keep the rivet tight in the hole.
Release the handles to grip more of the stem and press together
again until the stem breaks off.
|
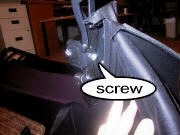
 Next you need to screw an "end plate" (see picture at right)
into the bottom part of the B-pillar (facing up when the top is on its back.)
Next you need to screw an "end plate" (see picture at right)
into the bottom part of the B-pillar (facing up when the top is on its back.)
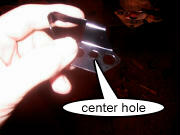 The soft top vinyl goes in between the two. This is a bit of a mess,
but easy to solve. First,
the tiny screw hole (the center one of the three holes in the B-pillar
bottom in the center of the picture to the left) should contain a screw
with a head big enough to hold the "end plate" in the picture to the right.
Since I did not have a crazy screw like that, I drilled out the tiny hole
in the B-pillar bottom to hold a decent size sheet-metal screw.
Also, the top metal turned out to be softer than the screw so that
I could screw it down with a bit of force without destroying the screw.
The soft top vinyl goes in between the two. This is a bit of a mess,
but easy to solve. First,
the tiny screw hole (the center one of the three holes in the B-pillar
bottom in the center of the picture to the left) should contain a screw
with a head big enough to hold the "end plate" in the picture to the right.
Since I did not have a crazy screw like that, I drilled out the tiny hole
in the B-pillar bottom to hold a decent size sheet-metal screw.
Also, the top metal turned out to be softer than the screw so that
I could screw it down with a bit of force without destroying the screw.
|
 Next I riveted the front end of the springs to the frame. It helps
to have the frame partly folded and to clamp the folded soft top material
out of the way while doing this.
Next I riveted the front end of the springs to the frame. It helps
to have the frame partly folded and to clamp the folded soft top material
out of the way while doing this.
|
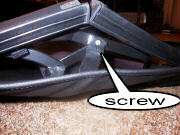 I screwed the short straps halfway the top to the longer bracket using
an metric M4 screw and a washer. (Stock is a Torx screw, I believe.)
I screwed the short straps halfway the top to the longer bracket using
an metric M4 screw and a washer. (Stock is a Torx screw, I believe.)
|
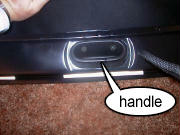 I screwed the handle from the old top onto the new one with the two screws.
|
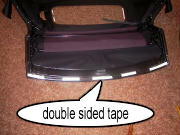 Now I attached the front of the vinyl to the front of the frame.
First you are supposed to cover the front of the frame with double sided
tape where it will hold the second-last plastic flap at the end of the
soft top.
Then, with the frame partly folded, you shove the soft top over the
front of the frame, press it on the tape and also screw a "set plate"
(a metal strip) over the final plastic flap using 7 screws.
(The new model has only four screws to screw down the set plate, but
I preferred to use the set plate from my old top with 7 screws.)
Now I attached the front of the vinyl to the front of the frame.
First you are supposed to cover the front of the frame with double sided
tape where it will hold the second-last plastic flap at the end of the
soft top.
Then, with the frame partly folded, you shove the soft top over the
front of the frame, press it on the tape and also screw a "set plate"
(a metal strip) over the final plastic flap using 7 screws.
(The new model has only four screws to screw down the set plate, but
I preferred to use the set plate from my old top with 7 screws.)
 This step worried me, since you need to get it correctly centered and
without stretching the vinyl. So I restricted the double sided tape
to 5 separate strips as shown in the picture on the left. Also note
in the picture that I put nylon locknuts in the square holes in
the top frame to screw the 7 screws into. Then I shoved
the front of the soft top over the front of the frame and removed the
cover paper from the central strip only. I pressed the plastic strip down
on this exposed tape and screwed in the center screw (without using the
set plate yet.) Then I moved to the strips next to the center one;
remove the cover paper, using needle-nose pliers, press down the plastic
strip, and held with a strategically placed screw. And the same for the
final strips of double-sided tape. Finally I took the screws out again
and then screwed in all 7 through the set plate, starting from the
center outwards. The final attached front is shown in the picture to
the right.
This step worried me, since you need to get it correctly centered and
without stretching the vinyl. So I restricted the double sided tape
to 5 separate strips as shown in the picture on the left. Also note
in the picture that I put nylon locknuts in the square holes in
the top frame to screw the 7 screws into. Then I shoved
the front of the soft top over the front of the frame and removed the
cover paper from the central strip only. I pressed the plastic strip down
on this exposed tape and screwed in the center screw (without using the
set plate yet.) Then I moved to the strips next to the center one;
remove the cover paper, using needle-nose pliers, press down the plastic
strip, and held with a strategically placed screw. And the same for the
final strips of double-sided tape. Finally I took the screws out again
and then screwed in all 7 through the set plate, starting from the
center outwards. The final attached front is shown in the picture to
the right.
|
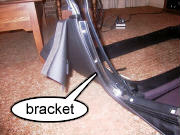 I screwed the three stainless steel brackets that will hold the three
rubber weatherstrips around each window to the frame. Six brackets in
all. The holes you screw through have some slack to allow adjustment
in position.
As a first guess, I aligned the brackets to the center of their holes, except
near the rear window corner where I pushed the brackets near the limits
to improve alignment.
I screwed the three stainless steel brackets that will hold the three
rubber weatherstrips around each window to the frame. Six brackets in
all. The holes you screw through have some slack to allow adjustment
in position.
As a first guess, I aligned the brackets to the center of their holes, except
near the rear window corner where I pushed the brackets near the limits
to improve alignment.
|
 I squeezed the "arms" of the end plates shut against the frame with
needle-nose pliers with the jaws covered with tape.
I squeezed the "arms" of the end plates shut against the frame with
needle-nose pliers with the jaws covered with tape.
|
 The weather strips at the rear edge of the windows have pins that push
into corresponding holes in the end plates. (The holes from which
we cleared the vinyl earlier.) Do not try to screw the
front weather strips to those holes, as I tried initially.
The weather strips at the rear edge of the windows have pins that push
into corresponding holes in the end plates. (The holes from which
we cleared the vinyl earlier.) Do not try to screw the
front weather strips to those holes, as I tried initially.
 Then it is a matter of shoving the rubber weather strip into the
stainless steel bracket. They go in surprisingly easy if you do it
right. First note that one side of the rubber strips has a simple
ridge that catches that side of the bracket, while the other side of
the rubber strips have a ridge below a flap of rubber. The side with
the flap goes towards the inside of the car. The technique is to
first push the outside ridge into the bracket and then press
the side with the flap straight down into the bracket from the top
to make the ridge catch.
Then it is a matter of shoving the rubber weather strip into the
stainless steel bracket. They go in surprisingly easy if you do it
right. First note that one side of the rubber strips has a simple
ridge that catches that side of the bracket, while the other side of
the rubber strips have a ridge below a flap of rubber. The side with
the flap goes towards the inside of the car. The technique is to
first push the outside ridge into the bracket and then press
the side with the flap straight down into the bracket from the top
to make the ridge catch.
|
 The front weather strips screw to the frame at their front edge. Also
note that I screwed on the clamps that grap the windshield header
from my old top; three screws each. These clamps can later be adjusted
for tension with a bolt inside.
The front weather strips screw to the frame at their front edge. Also
note that I screwed on the clamps that grap the windshield header
from my old top; three screws each. These clamps can later be adjusted
for tension with a bolt inside.
|
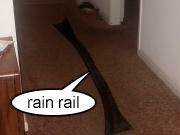
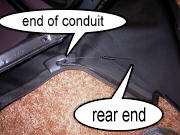
Preparing the rain rail.
I also got a new rain rail from Trussville Mazda to go with my new top.
Below is how I prepared the rail before the tech session, again in
my living room.
Removing the old top.
This was the start of the actual tech session. We removed the tops
of both my white and Jody's red Miatas. We took Jody's top, to be
discarded, off first to learn more about how to get the rain rail off
without damage.
 If you have a side-impact bar, remove the plastic end covers by pulling them
up. This required some force the first time.
If you have a side-impact bar, remove the plastic end covers by pulling them
up. This required some force the first time.
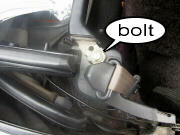 With the covers gone,
unscrew the big bolts (I think they were 17 mm) below them and take out
the bar.
With the covers gone,
unscrew the big bolts (I think they were 17 mm) below them and take out
the bar.
|
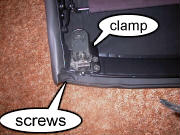
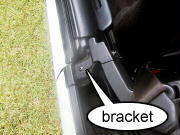 Remove the protective bracket at the door end by unscrewing the screw and
the 10 mm tenax bolt that holds the boot cover.
Remove the protective bracket at the door end by unscrewing the screw and
the 10 mm tenax bolt that holds the boot cover.
|
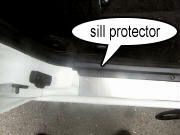 Remove the rearmost two screws of the door sill protector.
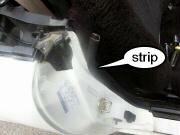 Then simply pull out the rubber strip at the rear edge of the
door opening.
Then simply pull out the rubber strip at the rear edge of the
door opening.
|
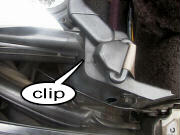
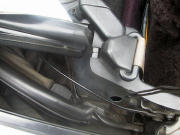 Now start removing the quarter panels (the plastic covers behind the
door rear edges.)
First pull out the clip at the top end of the panel. A bit prying with
a screw driver helps it come out easily. Pictures show the clip installed
and removed. We now have a opening through which we can later duct the
seat belt.
Now start removing the quarter panels (the plastic covers behind the
door rear edges.)
First pull out the clip at the top end of the panel. A bit prying with
a screw driver helps it come out easily. Pictures show the clip installed
and removed. We now have a opening through which we can later duct the
seat belt.
|
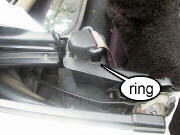
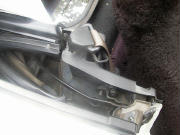 Push the protective plastic ring around the seat belt out of the
quarter panel. Pictures show the ring in place and pushed out.
Push the protective plastic ring around the seat belt out of the
quarter panel. Pictures show the ring in place and pushed out.
|
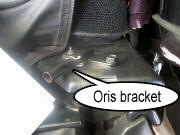 If you have an Oris like me, remove its brackets by unscrewing the bolt
and the tenax bolt. (See picture to the left.)
If you have an Oris like me, remove its brackets by unscrewing the bolt
and the tenax bolt. (See picture to the left.)
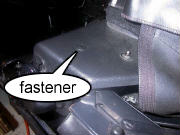 Otherwise, unscrew the tenax bolt and remove the
plastic fastener by lifting its center and pulling. (See picture to the
right.)
Otherwise, unscrew the tenax bolt and remove the
plastic fastener by lifting its center and pulling. (See picture to the
right.)
|
 The quarter panels can now be removed by pulling them off, while ducting the
seat belt through the slit in the back of the panels.
The quarter panels can now be removed by pulling them off, while ducting the
seat belt through the slit in the back of the panels.
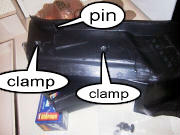
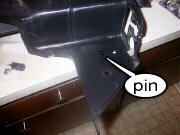 Note that the quarter panel is still held by two clamps and
a pin in its bottom part (left picture) as well as a pin in its
top part (right picture.) (During reinstallation, one of the metal
clamps dropped off; you can just slide them back on.)
It also helps if you start removing the
carpet on the rear deck by pulling out the plastic pins (nails?) along the
top edge of the rear wall (fire wall) of the cabin. You pull those out
by wedging a sturdy fork below them and pulling. Do not pull on the
carpet: you will just pull the carpet over the head of the pins.
I got a good tool for it at Wal-Mart.
Note that the quarter panel is still held by two clamps and
a pin in its bottom part (left picture) as well as a pin in its
top part (right picture.) (During reinstallation, one of the metal
clamps dropped off; you can just slide them back on.)
It also helps if you start removing the
carpet on the rear deck by pulling out the plastic pins (nails?) along the
top edge of the rear wall (fire wall) of the cabin. You pull those out
by wedging a sturdy fork below them and pulling. Do not pull on the
carpet: you will just pull the carpet over the head of the pins.
I got a good tool for it at Wal-Mart.
|
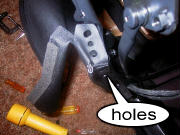
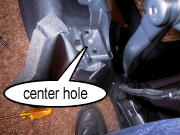
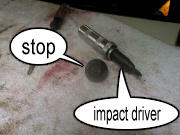 Continue removing all plastic pins from the piece of carpet covering the
rear deck. To get this piece of carpet off, you also need to unscrew
the two "bump-stops" that keep the top from crashing into the rear
deck when lowered or bumped. They are way behind the seat belt tower.
See the picture for a removed stop and the "impact driver" that was needed to
unscrew that stop from my 1996. The screws in both sides were in there
tight! Strangely enough, they were normally screwed down in Jody's 1992.
I wonder whether Bob's Upholstery who installed the Brain-Storm glass window
have a gorilla employed.
Continue removing all plastic pins from the piece of carpet covering the
rear deck. To get this piece of carpet off, you also need to unscrew
the two "bump-stops" that keep the top from crashing into the rear
deck when lowered or bumped. They are way behind the seat belt tower.
See the picture for a removed stop and the "impact driver" that was needed to
unscrew that stop from my 1996. The screws in both sides were in there
tight! Strangely enough, they were normally screwed down in Jody's 1992.
I wonder whether Bob's Upholstery who installed the Brain-Storm glass window
have a gorilla employed.
|
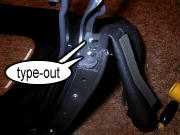
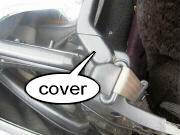
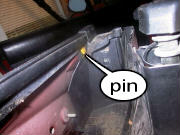 After you have the carpet off the deck,
there are still two of those plastic pins
hidden. You have to lower the top to get at them. We chalked the pin
yellow in the picture left to make it stand out. It is way back in the
corner behind the door. If you forget this one, you will rip up the
delicate rain rail when you try to remove the top.
As we did with the first top. Fortunately, we
were smart enough to remove the top we were discarding first. Even so,
we still created some cracks in the rain rail we were moving to the other car.
They are delicate. Anyway, after you remove the pin. you can take out
the black plastic "protector" on the corner above it.
After you have the carpet off the deck,
there are still two of those plastic pins
hidden. You have to lower the top to get at them. We chalked the pin
yellow in the picture left to make it stand out. It is way back in the
corner behind the door. If you forget this one, you will rip up the
delicate rain rail when you try to remove the top.
As we did with the first top. Fortunately, we
were smart enough to remove the top we were discarding first. Even so,
we still created some cracks in the rain rail we were moving to the other car.
They are delicate. Anyway, after you remove the pin. you can take out
the black plastic "protector" on the corner above it.
|
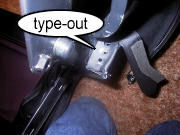
 After putting the top back up, unscrew the three "set plates" (steel
brackets) around the rear bottom of the top that have been uncovered
by removing the carpet. They are somewhat visible in the picture left.
They are held on by a total of thirteen 10 mm nuts (bolts on 1999 Miatas,
apparently.)
After putting the top back up, unscrew the three "set plates" (steel
brackets) around the rear bottom of the top that have been uncovered
by removing the carpet. They are somewhat visible in the picture left.
They are held on by a total of thirteen 10 mm nuts (bolts on 1999 Miatas,
apparently.)
|
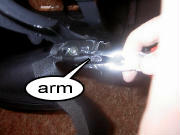
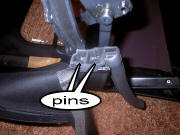
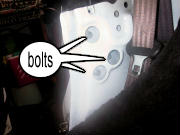 Now you can remove the three 12 mm bolts at each side that hold the
frame to the car (picture left.) The frame will still lie on two
"pins" (they are really screws,) one below the bracket ("link") through
which the removed bolts went and one below an "arm" attached to the
bracket. You can see the pins best when the top has been removed.
Now you can remove the three 12 mm bolts at each side that hold the
frame to the car (picture left.) The frame will still lie on two
"pins" (they are really screws,) one below the bracket ("link") through
which the removed bolts went and one below an "arm" attached to the
bracket. You can see the pins best when the top has been removed.
 Also carefully pry the rain rail off
the studs that hold it and from which you just removed the 10 mm nuts
(picture right.)
Easy does it: the rain rail will crack at the slightest
provocation. You can now lift off the top and put it on a protective
surface.
Also carefully pry the rain rail off
the studs that hold it and from which you just removed the 10 mm nuts
(picture right.)
Easy does it: the rain rail will crack at the slightest
provocation. You can now lift off the top and put it on a protective
surface.
|
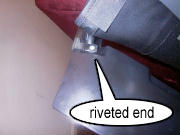
We found that the rain rail on my car was not riveted to the top.
Apparently, the upholstery shop that had installed the glass window in
my top also agreed that there is no need to rivet the rain rail to the
top.
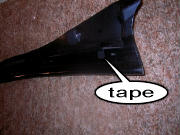
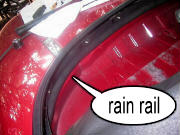
 Anyway, to start installation on Jody's car, we put the rain rail on
his car's studs. But first we taped up the rivet holes, as well as the
cracks we had made in the rain rail while removing it, with
electricity tape. (While the upholstery shop had not taped up the
rivet holes, the top never leaked, so taping the rivet holes may not be
essential. But we followed the Mazda Workshop manual that says that
you either tape the holes or use them to rivet the rail to the top.)
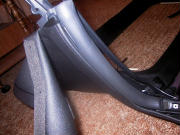
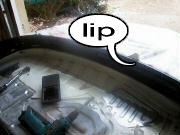
Make sure the top of the rain rail is below the rubber lip on the car.
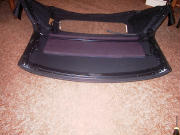
For the new rain rail on Bozo, the holes did not match up well front
to back, so we screwed the rain rail temporarily down on the studs
without using the set plates to let it "settle" a bit (see picture.)
Put the end protectors back on the corners at the doors and put
back the plastic pin.
Anyway, to start installation on Jody's car, we put the rain rail on
his car's studs. But first we taped up the rivet holes, as well as the
cracks we had made in the rain rail while removing it, with
electricity tape. (While the upholstery shop had not taped up the
rivet holes, the top never leaked, so taping the rivet holes may not be
essential. But we followed the Mazda Workshop manual that says that
you either tape the holes or use them to rivet the rail to the top.)
Make sure the top of the rain rail is below the rubber lip on the car.
For the new rain rail on Bozo, the holes did not match up well front
to back, so we screwed the rain rail temporarily down on the studs
without using the set plates to let it "settle" a bit (see picture.)
Put the end protectors back on the corners at the doors and put
back the plastic pin.
|
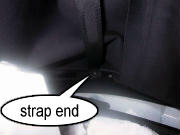 Next put the new top on, making sure the link brackets lie on the pins
without a gap. Screw the 6 bolts back in.
The rear bottom of the top goes inside the rain rail, with the big holes
in it
going over the studs. Also, on a 1999 top, the long straps go on the
studs corresponding to the innermost holes in the outer set plates.
(Picture all the way left.)
Next put the new top on, making sure the link brackets lie on the pins
without a gap. Screw the 6 bolts back in.
The rear bottom of the top goes inside the rain rail, with the big holes
in it
going over the studs. Also, on a 1999 top, the long straps go on the
studs corresponding to the innermost holes in the outer set plates.
(Picture all the way left.)
 Screw the set plates back on with the nuts.
For an zippable glass window, unzip the window and support the window
with a roll of paper towels (picture left.).
The long center bracket does
not seem to fit, but when you keep screwing it down (do not tighten it yet)
from one side, it will eventually go over all the studs. (Picture right.)
Now tighten the nuts in the special order given on miata.net to avoid
leaks. Basically, you tighten the outermost nuts at the doors first,
then the center one, then the ones in the corners, and then the rest.
Screw the set plates back on with the nuts.
For an zippable glass window, unzip the window and support the window
with a roll of paper towels (picture left.).
The long center bracket does
not seem to fit, but when you keep screwing it down (do not tighten it yet)
from one side, it will eventually go over all the studs. (Picture right.)
Now tighten the nuts in the special order given on miata.net to avoid
leaks. Basically, you tighten the outermost nuts at the doors first,
then the center one, then the ones in the corners, and then the rest.
|
Reassemble everything else removed
in inverse order. Do not forget to put the
quarter panels below the carpet before clipping them back on.
|
Conclusion
If I had to install a top again, I would definitely take the frame
off the car before doing anything. Even with the risk of damaging
the rain rail doing it. It is much more comfortable to deal with
the many hours of countless annoyances in the comfort of your air-conditioned
living room than contorted in a Miata in the hot Florida sun.
Also, riveting the rain rail to the top seems a big mistake to
me. It is a lot of work and seems to have only disadvantages
in making the installation more awkward.
|
A solemn moment
 Finally, I am pleased to be able to tell that Jody handed over his
long-awaited $10 club membership renewal. Good work Jody!
Finally, I am pleased to be able to tell that Jody handed over his
long-awaited $10 club membership renewal. Good work Jody!
|
Return