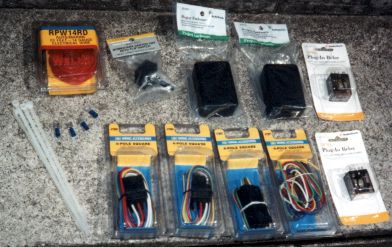
Assembled black boxes and other parts.

You will need the following parts to make the Black Boxes:
| Description | Notes | ||
|---|---|---|---|
| DPDT 12VDC 10A Relay | Radio Shack P/N 275-218 | ||
| Project Case | Radio Shack P/N 270-1801 | ||
| 6 Pole Trailer Wiring Harness | Wal-Mart 47995 | ||
| Foam Tape | For mounting them in the car | ||
| Permatex Super Weatherstrip Adhesive | For mounting them in the car |
 The 6 Pole
Trailer Wiring Harnesses can be found at Wal-Mart or local auto parts
stores. (UPC 79976-47995; see picture at right.) They are
manufactured by Hopkins Manufacturing Company, Emporia, Kansas (316)
342-7320, Part #47995. An identical harness (UPC 46494-08026) is
distributed by CALTERM, El Cajon, CA and also available at auto parts
stores. Just about any 6 conductor polarized connector will work, but
these listed have the advantages of color coded leads, a snug, water
tight/resistant fit, and easy availability at a reasonable cost. This
fit is so snug, however, I recommend connecting and disconnecting them
several times before installing them into the tight confines of the
car. It helps having one side in a vice to do this.
I originally tried using Radio Shack 6 position polarized connectors (274-226 & 274-236) but the headache of working in cramped quarters with no color coding and the additional soldering exceeded my desire. These connectors can be used, however I don't think it would be possible to make a "neat" unit.
If you use other than the Hopkins or Calterm connectors, be sure to update the drawings with the actual colors of the connectors you use
The case listed (1"x2"x3") requires a little modifying for the relay to fit properly, and it's still a snug fit. If you're not experienced at soldering or plan to use crimp on connectors, you may want to try the 1"x2"x4" case RS P/N 270-1802. Listed at $2.29 the added cost to the project is only $.60, but I opted for the smaller case to save space.
I originally intended to mount the cases with a single 6-32 machine screw epoxied on the inside of the case to absolutely prevent the case from coming loose. After a detailed inspection I decided too much disassembly of the car was required, and I was still unable to reach the underside of the chassis to install the nut on the screw. I decided to attach the case to the chassis with foam tape, with Permatex Super Weatherstrip Adhesive to aid in stickiness. If you mount the case with screw(s) I still recommend cushioning it with foam tape underneath.
You will also need the following parts:
| Description | Notes | ||
|---|---|---|---|
| SPDT Center-Off Momentary Flip Switch | Radio Shack P/N 275-709 | ||
| Female Quick Disconnects | Radio Shack P/N 64-3046. Price is for a package of 5. | ||
| Insulated Spade Tongues | Radio Shack P/N 64-3035. Price is for a package of 10. | ||
| Hook-up Wire | At least 16-14 gauge. |
Originally I looked for a rocker style switch, but the "momentary" feature is only available as a special order from Radio Shack $7.99 (RSU11336567.) I may try this switch in the future, it should fit in the switch knockouts near the cluster dimmer knob. The flip switch listed above doesn't fit in these knockouts and will require careful placement to prevent accidental operation. On the other hand, having the large switch located on the right side of the steering column makes for easier access (my left hand rarely leaves the wheel.) I finally decided on a single pole, double throw (SPDT) center off rocker switch obtained a local electronics parts store. It doesn't have the momentary feature, so I must manually return it to the center position. Virtually any SPDT or DPDT switch with a center off position will work.
The following are as needed:
| Description | Notes |
|---|---|
| Tie Wraps | Get a package at Wal-Mart. |
| Electrical Tape | Get at Wal-Mart. |
| Sealant | Aquarium or silicone. |
| Shrink Tubing | For quality work. |
| Solder | If you follow my advice. |
| Butt-End Connectors | If you ignore my advice on soldering. 18-22 gauge works best with 16 gauge hook-up wire. You need about 25 |
Soldering can be avoided by using crimp style connectors but I've only had luck with them when the wire ends were tinned with solder anyway. See the section on soldering.
Shrink tubing will make for a more professional installation and should be available at almost any electrical parts store. Two sizes will be required. One large enough to cover individually spliced wires, and another large enough to cover all 5 wires of the cable assemblies.