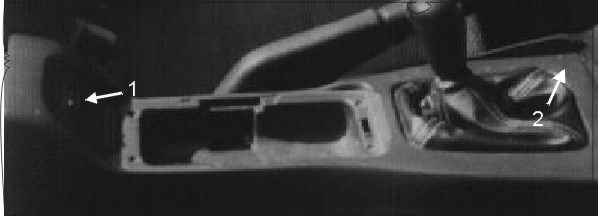
Suggested switch locations. Note that location 2 may not be visible when driving due to the hand brake handle.
Determine a suitable location for the switch. It should be easily accessible for the "Quick Wink", but not in the way (to be bumped by legs or when reaching for the lighter.) The switch listed doesn't fit in the cutouts in the dash very well. Before cutting or drilling for the installation of the switch, be certain there's ample room behind the panel for the switch wiring! Most of the dashboard and front center console has metal behind it. (Incidentally, the section on radio removal on miata.net may be helpful in removing the console.)
I located mine on the small panel between the cup-holders and console storage area. Another possible location would be just forward and below the button on the brake handle. This position seems like a natural position for the right hand, but may interfere with your audio system.
If the listed switch is used, simply drill a 15/32" hole and install the switch. Because I used a snap-in rectangular rocker switch I was forced to cut a rectangular opening. Using a sharp knife, slowly enlarging the drilled pilot hole, I ended up with a neat hole that the switch snapped securely into. Take your time, this will be the only visible part of the system (without detailed inspection.)
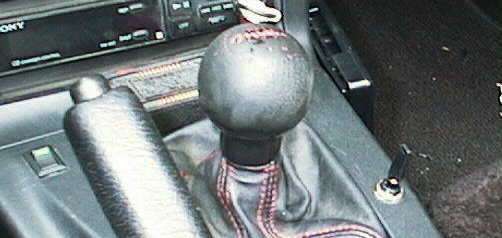
Next find a suitable ground connection. Because my switch is in the center console, I chose to use a bolt on the rubber shift lever boot. (A ring-type, instead of spade, connector is ideal for this bolt.) Don't try to tie into the ashtray light, neither of these wires are a true ground. Under the dash there are also many good grounds, look for a bolt you can loosen, slip a spade type connector under, then re-tighten.
Install the ground wire to the ground by soldering the spade connector onto one end of a wire. Run the wire to the switch, cut it to the proper length, and install a female quick disconnect. Install this quick disconnect to the number 2 terminal of the listed switch or the center terminal of a one pole switch.
Next you have to run a wire from each of the headlights to the switch. I was surprised to find that this was the most difficult part of the project for me. First I de-energized the circuit. Then I started by carefully cutting the existing tape away from the soft gray boot on the firewall that the existing wiring harness uses. Removing the relay cover provided some extra working space, but the clutch hydraulic line is just plain in the way. After exposing the end of the boot, the control wires can be pushed gently through the boot, and retrieved at the interior of the car. It may take a few tries to locate the wires. Gently pull them through.
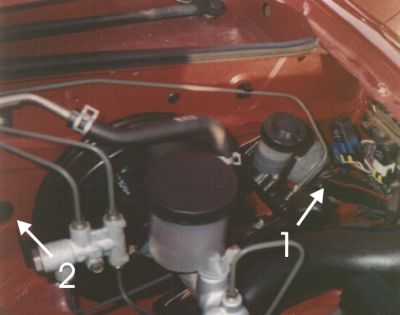 The location I used is indicated in the picture as 1.
Another possible way to duct wires out of the engine compartment into
the passenger compartment is to use the rubber grommet slightly to the
right of the steering wheel position. The grommet comes off the
firewall by squeezing it in the right place. You can cut a slit in the
rubber to pass the wires through without noticeable effect on its water
resistance. This is indicated as location 2. I will assume you use
location 1.
The location I used is indicated in the picture as 1.
Another possible way to duct wires out of the engine compartment into
the passenger compartment is to use the rubber grommet slightly to the
right of the steering wheel position. The grommet comes off the
firewall by squeezing it in the right place. You can cut a slit in the
rubber to pass the wires through without noticeable effect on its water
resistance. This is indicated as location 2. I will assume you use
location 1.
I then ran the wires in the engine compartment through all the tie downs the existing harness uses, and used tie wraps to hold them in place where there were no existing tie downs. Make sure the wires are not run across any sharp metal edges or engine components that will get hot. Check to be sure they will not get pinched when closing the hood.
Solder the ends of the wires to the white wires on the chassis connectors and tape up these solder joints. Pull any slack out of the wires, moving toward the interior of the car, tightening the tie wraps as you go. Gently pull the remaining slack into passenger compartment. In the future, I may move these wires into the existing plastic conduit, but after trying to get the tape off the gray boot, I'm somewhat reluctant.
Because my switch is located on the right side of the driver, I then ran the existing length over the frames for the clutch pedal and steering column, right along the top of the dash. Be sure to feel for sharp metal edges before deciding on the path you choose, there are plenty of them. It would be much simpler to run the wires along the lower edge of the dash, or tie wrapping it to existing harnesses, but I didn't want it to be in the way when removing the panel below the steering column.
Run the wires all the way up to the switch, cut them to the proper length, and install a female quick disconnect on the end of each. These are useful in the event that the wires are installed backwards (i.e. switch to the left, right headlight goes up) they can simply be swapped. Install these on the 1 and 3 terminals of the listed switch, or on the two outside terminals of a one pole switch.
Re-energize and test the circuit.